Immunochemical Methods
Immunocytochemistry or immunohistochemistry is the identification of a tissue constituent (protein, lipopolysaccharide, etc.) in situ by means of a specific antigen/antibody reaction tagged by a visible label. immunohistochemistry usually refers to a light level detection and immunocytochemistry usually refers to detection at EM resolution.
The antigen is the protein or target of interest. An antibody is a structure created by the immune system to seek out and bind with a specific antigen. An antigen is composed of many segments called epitopes. The epitope is the region that will bind with the antibody.
Because of the special relationship between the antigen and antibody, care must be taken to assure that neither is altered beyond recognition by it’s counterpart, while at the same time maintaining the integrity of the tissue or cell in which the antigen resides.
Antibody structure
The overall structure of the antibody is a Y shape. The combining (or reactive) sites are located on the ends of the two arms. The structure of these two ends vary from one antibody to another. The third region is not involved in antigen binding. The reactive sites of the antibody are formed by four polypeptide chains bonded by bridges between sulfur-containing amino acids. A pair of identical light chains is linked to a pair of heavy chains.
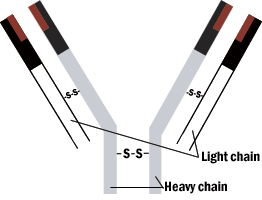
Figure 1. Schematic model of immunoglobulin molecule.
Antibody structures are complex multichain proteins that have the same overall shape, yet each has unique regions that promotes binding to one antigen and not another. Folding of the antibody chains create clefts and hollows, which conform to the shape of the antigen, so that weak intermolecular forces can bind the antigen to the antibody.
Types of Antibodies:
A. Monoclonals are antibodies specific for only one antigenic site.
B. Polyclonals are a mixture of antibodies, each specific for particular epitope of the same antigen.
Types of Immuno labeling:
A. The direct labeling method requires only one step in which a specific antibody is complexed directly to the visible marker.

Figure 2. Schematic representation of direct labeling.
B. Indirect labeling is a two-step method which uses an antibody specific for the antigen and a secondary antibody coupled to a visible marker.

Figure 3. Indirect labeling schematic
C. Multiple labeling (also referred to as double or triple labeling, etc.) refers to the simultaneous localization of two or more different antibodies. Obviously a different marker for each antibody must be employed
Specific Markers:
A. Fluorescent probes may be used for obtaining antigen localization at the light level. With the invention of the laser scanning confocal microscope, this technique is especially powerful, and relatively simple.
B. Gold particles are currently the most popular tags for electron microscopy immunostaining and are used with increasing frequency at the light level as well. The particles are discreet in the electron microscope and hard to mistake. They come in a variety of sizes for double labeling. At the light microscope, a silver enhancement technique must be employed for visualization. An epi-polarizing filter enhances detection of the heavy metal label.
C. Horseradish Peroxidase (HRP)is an enzyme tag attached to an immunoglobulin with the intent of using the catalytic properties of the enzyme to form an insoluble reaction product.
D. Other enzyme markers are alkaline phosphatase, beta galactosidase, and glucose oxides. These enzymes, like HRP, require a chromogen (usually diaminobenzidine,DAB or 3-amino-9-ethylcarbazole, AEC).
Enhancement Mechanisms:
A. Hybrid binding is achieved by constructing the IgG molecule from two different antibody Fab portions, one directed against the antigen and one against the tag.
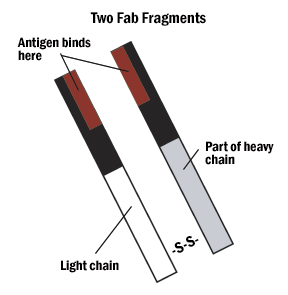
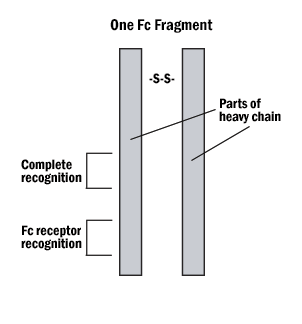
Figure 4. The Fab and Fc fragments of the antibody can be enzymatically separated for hybrid binding or very specific indirect labeling.
B. Protein A or G can be tagged on the Fc (non-reactive portion) of the IgG, leaving both reactive sites free to bind with the antigen.

Figure 5. Protein A schematic.
C. Silver enhancement may be done when a gold particle is too small to be seen, as in a preembedment procedure, or light level observation. The silver will enucleate the gold particle.

Figure 6. silver enhancement of gold.
D. Tyramide Signal Amplification
- Boosts signal 1000x
- Easily incorporated into protocol
- Signal to noise ratio
- Sequential multi-color detection
- EM applications
- Tyramide can't diffuse
- Can use with in situ PCR or as alternative to PCR
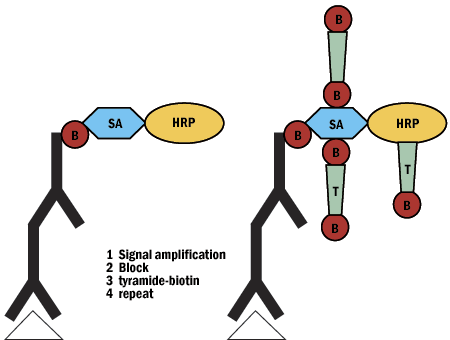
Figure 7. Tyramide signal amplification schematic
Enzyme Controls
A. A positive control should be employed whenever possible in parallel with the test sections to demonstrate reagent viability.
B. A negative control can be easily made by destroying the enzyme activity in a positive control by immersing in boiling water for 15 minutes, or by a specific chemical method for the enzyme to be demonstrated.
C. A useful control is to incubate one of the test sections in the reaction mixture without the substrate for the same time that the test samples are being run. Both sections are taken through the rest of the technique together.
Immuno Controls
All experiments should be performed with a series of controls conducted simultaneously. Any “positive” result should be looked at skeptically until all controls are analyzed.
A. Adsorption. The primary antibody is reacted with an excess of antigen. This control shows that the antigen and not some other substance is responsible for the localization seen. The absorbed solution should not react with the antigen in localization protocols.
B. Tag or Unlabeled antibody. These are used separately in place of the conjugated antibody. This control determines that the specific properties of the labeled antibody are responsible for the localization.
C. Omission of primary or secondary antibodies. If labeling is seen under these conditions, then it is not the labeling intended as a result of antibody/antigen interaction.
D. Use of pre-immune sera. Collection of sera prior to production of primary antisera used in place of the primary antibody will test “positive” if some component in the immune sera other than the specific IgG is responsible for the binding. Usually it will not be possible to obtain pre-immune serum from the same animal, but it is possible to employ normal serum from the same species.
Specimen Preparation
For Enzymes
Most enzyme activity requires tissues to be as fresh as possible. Fixatives, if they can be used, should be refrigerator cold to preserve as much enzymatic activity as possible.
Some common reactions that cannot survive fixation are acid and alkaline phosphatases and esterases. Enzymes do not survive at temperatures over 55 degrees Celsius.
For Immunoreactions Pre-embedding vs. Post-embedding
A. Pre-embedding procedures
1. Cell surface labeling prior to fixation
a. Frozen sections
b. Vibratome sections
2. Permeabalization may be necessary for penetration, but usually results in poor morphology.
a. Freeze/thaw
b. Detergents (Saponin, Triton-X)
c. DMSO
Pre-embedding immunolabeling
| 1. Time required | 2-3 days |
| 2. Sectioning | Easy |
| 3. Labeling | Possible throughout sectioning |
| 4. Serial sections | Easy |
| 5. Storage | Blocks and sections easy |
| 6. Equipment | Common in EM lab |
| 7. Disadvantages | Loss of structure, translocation with permeabalization |
B. Post-embedding immunolabeling enables more control of morphology
1. Fixation allows storage
2. Embedment media may mask antigens
3. Fixation changes protein structures
a. Etching or unmasking may be necessary
b. Fixation choices for immunoreactions
The goal of fixation is to stabilize the cellular constituent in their native positions.
1. Chemical fixation will insure good morphology, but may compromise antigenicity and/or enzymatic activity
a. A dot immunoreactive test may help to determine antigenicity. (Appendix B)
b. Overfixed tissues may respond to epitope retrieval methods. (Appendix E)
2. Physical fixation may preserve antigen integrity but at the expense of morphology. For many enzymatic techniques frozen specimens may be necessary.
a. To minimize ice crystal damage a cryo protectant is used.
- sucrose
- DMSO
- glycerol
- embedment media
C. Other conditions for optimizing reactions
1. pH
2. Concentration of antibody and/or substrate
3. Concentration of trapping reagent.
4. Temperature (Enzymes usually will not survive temperatures over 55 degrees Celsius).
5. Reaction or fixation times.
D. Blocking reagents can be used to block background staining due to cross-reactivity or multispecficity.
Closely related antigens whose molecular shape and charge distribution may be similar to the original antigen and may fit the same antibody. They are said to cross-react.
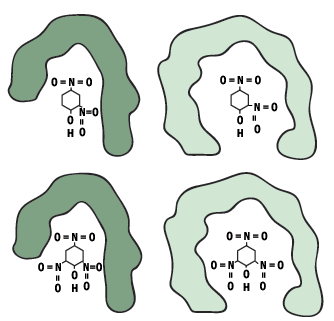
Figure 8. Two antibodies cross react with a related antigen (DNP).
Very different antigens have been known also to bind with a single antibody, the close contacts of the edges of the antigen and the amino acid sites that form the walls of the of the combining site of the antibody may cause it to become bound. This feature is termed multispecificity.

Figure 9. The same antibody reacting with two very different antigens (Multispecificity).
Recommendations for Starting an Immunocytochemistry Project
A. Clarify the source and quality of antibody. Study the characteristics of the antigen. ***Check the literature.***
1. Quality of the Antibody
a. Polyclonal or monoclonal?
b. Purification method if polyclonal?
c. Specificity tested?
d. Raised in which animal?
2. Characterize the antigen
a. Intracellular or extracellular?
b. Which species produced the protein?
c. Size?
B. Start with immunofluorescence.
1. Check specimen for autofluorescence
2. Common fluorescent dyes
a. Fluorescein-isothiocyaniate (FITC)
b. Tetramethylrhodamine (TRITC)
3. Test this method on frozen or lightly paraformaldehyde-fixed samples.
C. Test EM fixatives at the light level with immunoperoxidase or immunogold methods.
1. Common methods
a. Peroxidase-anti peroxidase (PAP)
b. Avidin-biotin complex (ABC)
2. Various fixatives
a. Glutaraldehyde
b. Paraformaldehyde
c. Glutaraldehyde/paraformaldehyde
d. Periodate-lysine-paraformaldehyde (PLP)
3. Reaction products are visible at both LM and EM.
D. Select EM protocol if necessary (see Appendix D)
Appendix A: Autofluorescence
Problem tissues:
- Epithelia (stratum corneum & glandular)
- Leukocytes (neutrophil and eosinophil)
- Myocardial fibers
- Nervous tissues
Causes:
- Endogenous enzyme
- Double bonding
- Aldehyde fixation
- Age
Fixatives:
1. Methanol with 1% acidic acid & 1% Na nitroferricyanide
2. 0.05% phenylhydrazine
3. H 2 O2
4. 0.074% HCl in absolute ETOH (0.2 ml/100ml).
Quenching procedures for autofluorescence:
1. Formaldehyde vapor (60°C - 80°C)
2. Eriochrome black
3. Sodium nitrite
4. 1:5 or 1:20 IgG anti-sera
5. Pronase
6. Trypsin
7. Pepsin (4mg/ml in 0.01 N HCl @ 37°C for 20-30 minutes)
8. Mayer’s hematoxylin counterstain
9. Pontamine Sky Blue
Appendix B: Dot-Blot Test
1. Nitrocellulose paper is cut into narrow strips. Use forceps to handle paper.
2. Wash the paper 5 minutes by gentle agitation in distilled water.
3. Let dry at room temperature.
4. A diluted solution or suspension of antigen in saline is dotted onto the filter. Use ~20ul.
- Complex antigens can be used at 0.1-1.0mg/ml.
- Less complex antigens can be diluted accordingly.
- Nucleic acid binding requires baking 60 minutes at 80°C.
5. Dry thoroughly. Can be stored several weeks at this stage.
6. Blocking is done with 3% BSA in 1% normal serum in TBS with gentle agitation for 15 minutes.
7. Incubate with the test antibody for 2-4 hours at room temperature, or overnight.
8. Wash in TBS 30 minutes (several changes).
9. Repeat the blocking step.
10. Incubate the filter for 2 hours with a horseradish peroxidase-conjugated secondary anti body targeted against the test antibody. Concentration may vary, but 1/1000 in blocking solution is about right.
11. Wash in TBS 30 minutes (several changes).
12. Develop with 4-chloro-1-naphthol and hydrogen peroxide.
13. A positive reaction results in a blue spot on a white background in 2-15 minutes.
This test can be used to determine optimum concentrations and fixatives before actual immunostaining of experimental samples.
Development solution:
3mg/ml chloronaphthol in methanol. Stock solution can be kept in the dark, in the cold, for 1-2 weeks. Discard when signs of yellowing appear. Just before use dilute with 5 volumes TBS and 0.01% hydrogen peroxide.
Appendix C: Sample Protocol for Immunofluorescent Staining of Frozen Sections
1. Cut 8-10 mm sections and place on a Super Frost Plus charged slide. Allow slide to come to room temperature and dry. *
2. Block for non-specific proteins by placing slides in a solution of PBS (pH 7.4) with 10% normal serum (of the animal the secondary antibody was made in). Block for 30 minutes at room temperature.
3. Place in primary antibody diluted with PBS (pH 7.4) with 1% fetal bovine serum. ** This step may be done for 1 hour at room temperature or overnight at 4°C.
4. Wash well in 3 changes of PBS @ 5 minutes each (with agitation if possible).
5. Apply secondary antibody (against animal of primary antibody and conjugated with a fluorescent probe) diluted with PBS (pH 7.4) with 1% fetal bovine serum. Leave in this solution for 30 minutes.
6. Wash well in 3 changes of PBS @ 5 minutes each (with agitation if possible).
7. Mount with Vecta Shield mounting media. Seal the edges with nail polish. If slides will not be viewed immediately, store in a humid, dark, and cool environment for up to a week.
* This is the only time the samples should be allowed to dry out. After step two they must remain moist, or false positives may result.
** Both primary and secondary antibody dilutions must be determined by running a series of dilution factors for each. Do this even if the antibody has been tested in another laboratory. The following chart may be helpful.
Slide # Primary dilution Secondary dilution Amount of specific staining (++,+,-)
A 1/100 1/100
B 1/100 1/500
C 1/100 1/1000
D 1/100 no secondary
E 1/500 1/100
F 1/500 1/500
G 1/500 1/1000
H 1/500 no secondary
I 1/1000 1/100
J 1/1000 1/500
K 1/1000 1/1000
L 1/1000 no secondary
M no primary 1/100
N no primary 1/500
O no primary 1/1000
P no primary no secondary
Appendix D: Standard Incubation Schedule for EM-Immunogold Post Embedment Staining
Prepare Incubation Buffer:
PBS, (10mM Phosphate buffer, 150 mM NaCl), pH 7.4
0.5% Bovine Serum Albumin, 0.1% gelatin, 20mM NaN3. Check the pH and adjust to 7.4 if necessary.
1. Incubate with 0.05 M glycine or lysine in PBS.
15 minutes
2. Block in 5% normal serum (same species as secondary).
30 minutes
3. Incubate with a dilution of the primary antibody (1-5ug/ml) in incubation buffer. Or overnight at 4oC
30min-1 hour
4. Incubation buffer
6 x 5 min.
5. Dilution of Immunogold conjugate (1/75-1/150)
2 hours
6. Incubation buffer
6 x 5 min.
7. PBS
3 x 5 min.
8. Post-fix in 2.5% glutaraldehyde
5 minutes
9. PBS
5 minutes
10. ddH2O
5 x 2 min.
11. Contrast stain as usual
All solutions are placed as droplets on clean parafilm surface. Grids are placed, section down on top of droplet for incubation times.
Do NOT use copper grids. Nickel grids are preferred as they will not react with gold colloid.
Appendix E: Epitope Retrieval
A. Heat induced epitope retrieval (HIER)
Buffers
- 1mM EDTA pH 8.0
- 0.01M Citrate buffer pH 6.0
- Tris-HC
- Urea
- Heavy metal solutions (zinc, lead)
- Other company-made products
Heat solution to a boil using pressure cooker, rice steamer, hot plate, hydrated autoclave or microwave. Place sections in solution and continue heating 10-30 minutes.
B. Enzyme epitope retrieval
Common enzymes used for this purpose
- Trypsin
- Pepsin
- Pronase
- Protein Kinase*
- Ficin
- Dnase
C. Ultrasonic
D. Formic acid


